
Apple Pay Integration
Apple Pay simplifies the checkout experience by allowing users to make payments quickly and securely using their iPhone, iPad, or Mac. It eliminates the need to manually enter credit card details by leveraging device-based authentication and encrypted tokenization.
There are two integration scenarios with Payarc for Apple Pay. In both cases, Payarc handles the decryption of the Apple Pay encrypted payment data and processes the transaction securely. This benefits both customers and merchants: customers enjoy a faster and more secure checkout experience, while merchants can trust that Apple has authenticated the cardholder before payment is initiated.
- Apple Pay Button Integration: The merchant hosts the Apple Pay button directly on their site or app and sends encrypted payment data to Payarc for processing.
- Hosted Checkout: Payarc provides a hosted checkout page that supports Apple Pay, simplifying implementation for merchants.
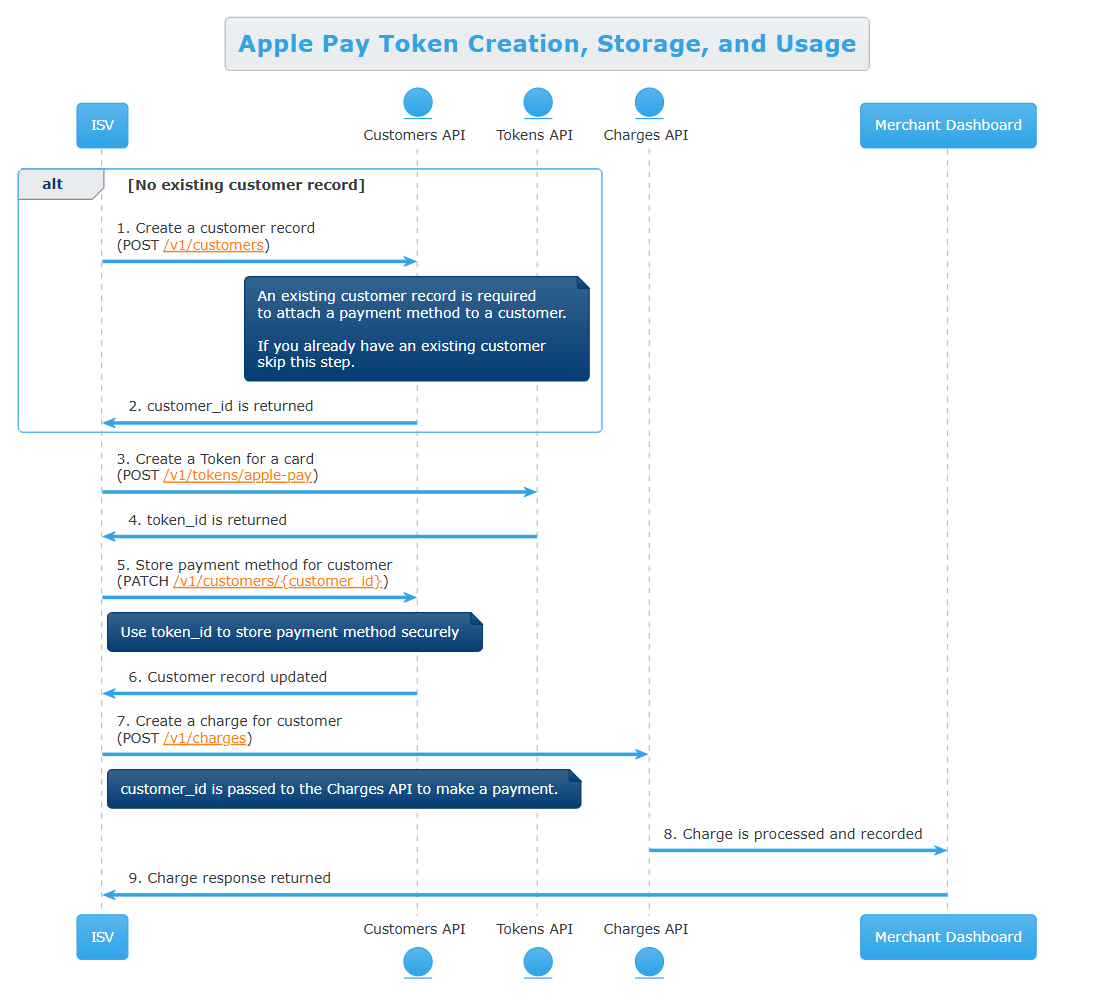
Transaction Process Using Apple Pay’s Digital Wallet
For support related to Apple, please contact Apple Support. For questions related to Payarc, please reach out to Payarc Support.
Merchant is hosting Apple Pay button
Prerequisites
Before proceeding, please familiarize yourself with the Setting Up Apple Pay and review our Apple Pay API reference. The following items must be completed before starting the integration:
🔐 1. Generate CSR (Certificate Signing Request)
Payarc will generate a CSR (Certificate Signing Request) — a public key file required by Apple to create the merchant certificate.
- A unique CSR is generated per merchant account.
- You can use the same Apple Pay certificate for multiple domains or subdomains as long as they are registered under the same Apple Developer account and associated merchant identifier.
- If you manage separate Apple Developer accounts (for example, different business entities), a separate CSR and certificate are required for each.
To request a CSR, please contact Payarc Support
⬆️ 2. Upload CSR to Apple Developer Portal
The integration partner will need to:
- Log in to the Apple Developer Portal
- Upload the CSR under Certificates > Apple Pay Payment Processing Certificate
📥 3. Download Apple Certificate
Once uploaded, Apple will provide a certificate file named: apple_pay.cer
🔒 4. Securely Return the Certificate to Payarc
Please password-protect the downloaded apple_pay.cer file before sending it back to Payarc.
You can secure the file by compressing and encrypting it with a strong password using common formats like .zip or .7z. For example, you can use 7-Zip to create a password-protected .7z archive.
Integration Steps
- Integrate the Apple Pay Button
Implement the Apple Pay button following Apple’s developer documentation.
You must configure your site to support Apple Pay on the Web, including domain verification. - Capture Apple Pay Payment Token
When the user confirms payment, Apple Pay will return a payment token containing encrypted card data. - Send Encrypted Data to Payarc
Use the Payarc tokenization endpoint to securely transmit the Apple Pay encrypted data for decryption and transaction processing.
Performing Transactions
To register a transaction with Payarc, follow these steps:
-
Collect the Encrypted Payment Token - After the user authorizes the Apple Pay payment (via Face ID, Touch ID, or passcode), your frontend will receive an encrypted payment token from Apple Pay. You must capture this token and pass it to Payarc for decryption and processing.
-
Send the Token to Payarc - Submit the encrypted token to Payarc using the following API request
Example API Request:
1. curl --request POST \
        --url https://testapi.payarc.net/v1/tokens/apple-pay \
        --header 'Accept: application/json' \
        --header 'Authorization: Bearer YourAPIBearerKey' \
        --header 'Content-Type: application/json' \
        --data '
   {
     "apple_encrypted_data": "eyJhbGciOiJIUzI1NiIsInR5cCI6IkpXVCJ9c...."
   }
   '
🔐 The apple_encrypted_data field must include the full encrypted payment token you received from Apple Pay.
-
Process the TransactionPayarc will:
- Decrypt the Apple Pay token
- Return a usable payment token in response
You can then use this token to complete the payment using Payarc’s standard transaction APIs.
Updated 4 months ago